Object
The object of the game is to be the first player to move all of your markers around the designated path and off the board.
Game Board
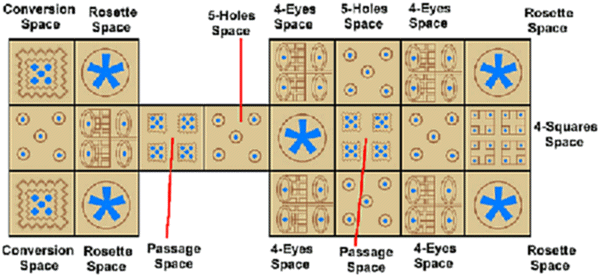
The following diagram identifies the names of the various board spaces as they are referenced in these rules. Note that the names given are not based on any type of archeological analysis or historical research.
Setup and General Course of Play
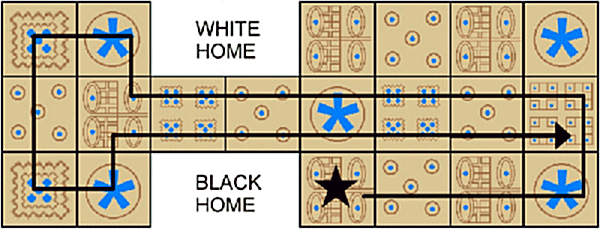
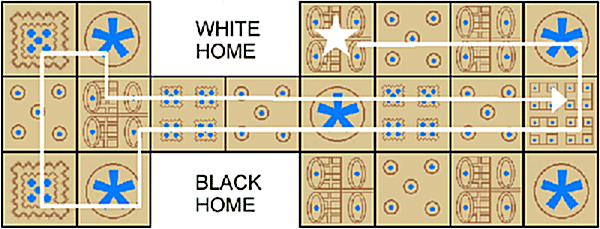
Each side starts with 7 markers in their home areas as indicated in the diagrams below. Black must follow the path indicated in diagram 2 and white must follow the path indicated in diagram 3. The diagrams also indicate the first space entered as markers are moved onto the board (indicated by a star). Players roll their "dice", and move their markers along their designated paths the indicated number of points (one point for each white tipped end pointing up) one space per point. There are special rules covering the case where there are no white tips facing up (i.e. a zero is rolled).Markers exit the board, called "bearing-off", via the 4-squares space in the middle row at the end of the board. To "bear-off" a player must roll the exact number to move a marker one space past the 4-squares space (however see the Special Spaces rules below).
Start
To start the game both players roll their dice and move a single marker onto the board, counting their star space (see diagrams above) as the first space entered. If a player rolls a zero, he may move to any available space along his starting row, but not past his Rosette space. Markers enter the board with their dotted side down and their blank side face up. These are referred to as "blank" markers.The player that moved his first marker the furthest along the path is designated as the first player. If both players move equal distance (i.e. rolled the same number of points) then they continue rolling simultaneously, and moving only their first marker until one player moves further, and hence gets to be the first player. Once the first player is determined their turns alternate as explained in the next section.
If both player's markers end on the same space past their Rosette spaces, then both markers are returned home and the players start over until a first player is determined. If a player rolls a zero on his dice, he may use the special "jump" rules given below. Note that jumps from a player's starting track is limited by the presence of the Rosette spaces (see Jump rules below). If both players roll zeros before a first player is determined, such that they may both jump to the same space, that roll is ignored and both players re-roll.
Sequence of Play
After the first player is determined, play proceeds in an alternating manner; the first player rolls and moves, then the second player rolls and moves.Markers may only move forward along their designated paths and only 1 marker may occupy a single space (however see Special Spaces rules below).
A player moves one marker each turn the number of points indicated on his dice roll. Only one marker may be moved per turn, either a marker already on the board or a marker may be moved from its home onto the board. Again, a roll of zero allows a marker to start at any available space along his starting row but not past the first Rosette space.
Markers may be moved over other pieces (including opposing markers), however there are restrictions on ending a move on an occupied space.
If a player cannot move a marker the full amount indicated on his dice roll he loses his turn.
A player must move a marker if at all possible; he may not forfeit his turn if he has a legal move available.
Whenever a player rolls a 0 and is able to make a move with one of his markers (see Jump rules below), he is awarded an immediate free turn.
Conversion

|
When a marker lands on either one of the Conversion spaces, it is flipped over to its dotted side; such markers are referred to as "dotted" or "converted".
Markers must be converted to their dotted side before proceeding past the second Conversion space along their designated path. |
Passing over a Conversion space does not convert a marker to its dotted side; it must end its move on one of the two Conversion spaces to be converted.
A blank marker may not land on a Conversion space occupied by an opposing dotted marker.
Jump Move
When a player rolls a zero on his dice, he may move one marker forward along his path to any available space but not past a Rosette space; this move is called a Jump move.An "available" space along the path is normally an empty space, however there are spaces that allow more than one marker, so the "next available" space may be one of these spaces that is not totally occupied.
If a player rolling a zero is able to make a legal Jump move, he immediately gets one free turn.
Jump moves may be used to bring markers onto the board from their home.
Markers may not capture an opposing piece under any circumstances while making a Jump move.
An un-converted marker may not Jump past its second Conversion space.
Capturing
When one player's marker is moved onto a space occupied by an opposing marker, that opposing marker is captured and must return home to start over.A marker may only be captured by an opposing piece of the same type; blank or dotted, i.e. a dotted marker may not capture a blank marker and vice versa.
A player forfeits any free turns he has been awarded whenever he captures an opposing marker (see Special Rules below).
Bearing Off
A marker may only bear-off if it rolls the exact number required to move one past the 4-Squares space, (however, see Special Spaces rules below). Once a marker has beared-off, it may not re-enter the board.
Special Spaces
These rules present exceptions to the general rules given above:

|
Rosette; up to 2 markers of either side and either type may occupy a Rosette space. Rosette spaces are also protected spaces; a marker may not be captured while on a Rosette space. Markers may never jump past a Rosette space. |

|
4-Eyes; when a marker lands on a 4-Eyes space the player is awarded an immediate free turn. This free turn is forfeited if he captures an opposing piece landing on the 4-Eyes space. A player is not awarded an additional free turn by making a Jump move to a 4-Eyes space; only 1 free turn. |

|
Passage; Passage spaces may be occupied by two markers provided they are of different type (dotted or blank). The two markers may be opposing markers. Passage spaces do NOT provide protection to markers on them. |

|
4-Squares; A dotted marker may bear-off from the 4-Squares space on a roll of zero (or one). The 4-Squares space may be occupied by 2 markers of different type the same as a Passage space. |
copyright Ben Myers 2005


